V-COIL Oil Drain Threads Repair Kit
Damaged oil drain screw thread? Here is how to restore it step by step.
You scanned the QR code at the vehicle. On this page you find everything you need to carry out the repair: short explanation, video tutorial, image sequence and answers to typical questions.
What this kit helps you with
The V-COIL Oil Drain Threads Repair Kit is designed for quick, clean and reliable repair of damaged oil drain screw threads.
Repair instead of replacing
Restore damaged oil drain threads and often avoid replacing the complete oil pan.
Work on the installed oil pan
In many cases the repair can be carried out directly on the vehicle after draining the oil.
Special HexTap OS
Dedicated tap for oil drain screws to create a new, defined receiving thread for the new screw.
New screws & sealing rings
Kit includes new oil drain screws and matching sealing rings for typical applications.
For aluminium and steel
Suitable for many aluminium and steel oil pans – ideal for workshops and service teams.
Compact workshop kit
Everything together in a robust box – easy to store in the workshop or service vehicle.
What is inside the Oil Drain Threads Repair Kit?
A clear assortment for one specific job: restoring the oil drain screw thread.
The threads of the oil drain screw are opened and closed again and again during oil changes. Especially in aluminium oil pans, the original thread can become worn or stripped – the screw no longer tightens correctly and oil may leak.
The V-COIL Oil Drain Threads Repair Kit contains the most important components you need for a practical repair:
- HexTap OS special tap for cutting a new receiving thread for the oil drain screw.
- New oil drain screws in common metric sizes (depending on kit version).
- Matching sealing rings for a secure, flat seal on the oil pan.
Together with a ratchet, a torque wrench and new engine oil, the kit enables you to restore a safe and tight connection.
Repair process in moving pictures
The video shows the complete procedure: from the damaged thread to the newly installed oil drain screw. Ideal if you are standing under the vehicle and want to see each step quickly.
Combine the video with the written steps below and the image sequence further down the page.
Step-by-step instructions
The following sequence describes the basic procedure. Always observe the vehicle manufacturer’s instructions.
-
Prepare the vehicle and drain the oil.
Safely lift and secure the vehicle. Place a drain pan under the oil pan and drain the engine oil completely. -
Remove the old oil drain screw.
Unscrew the drain plug and clean the area around the damaged thread from oil and dirt so that you can work clearly. -
Select the correct HexTap OS and cut the new receiving thread.
Choose the appropriate tap from the kit. Using a ratchet or wrench, cut the new receiving thread straight into the bore. Back off regularly to break the chips. -
Remove chips and clean the sealing surface.
Carefully remove produced chips from the thread and sealing surface. Make sure that no swarf remains in the oil pan. -
Install the new oil drain screw with sealing ring.
Select the matching screw and sealing ring from the kit. Lightly oil the threads, place the sealing ring on the screw and screw it into the new thread. Tighten with a torque wrench according to the vehicle manufacturer’s specification. -
Refill oil and check for leaks.
Refill engine oil, start the engine briefly and check the drain area for leaks. Correct the torque if necessary.
Note: The exact procedure can vary depending on vehicle type. If you are unsure, contact a professional workshop.
Safety & good practice
- Work only on a safely supported, secured vehicle.
- Wear suitable personal protective equipment (gloves, safety glasses).
- Dispose of used oil and oil filters according to local regulations.
- Re-check the drain screw visually at the next service or oil change.
Visual guide: from kit to tightened oil drain screw
These images show the practical sequence: preparation, cutting the new receiving thread and tightening the new oil drain screw.
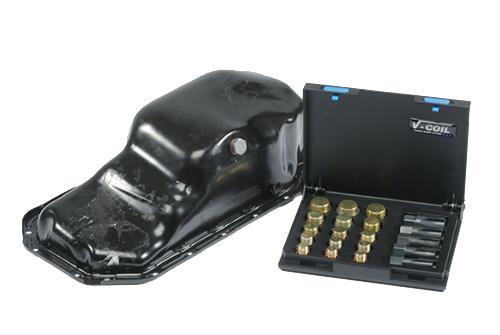
Kit overview
All components together: HexTap OS, oil drain screws and sealing rings in a compact box.
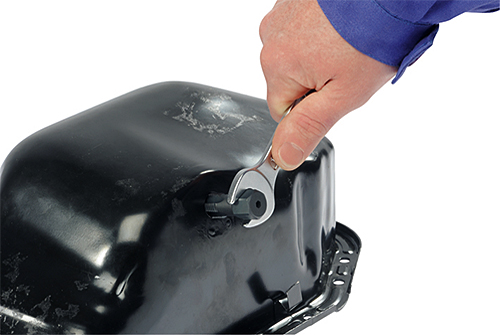
Cutting from the outside
The HexTap OS is guided from the outside to create a new receiving thread in the damaged bore.
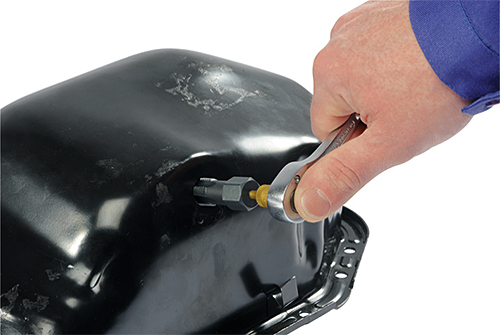
View of the new thread
The inside view shows the newly cut thread that will later hold the new oil drain screw.
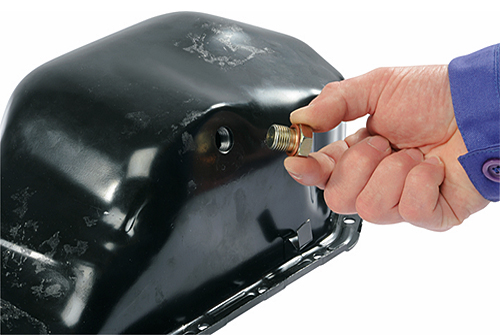
Tighten the new screw
The new oil drain screw with sealing ring is tightened in the repaired thread to the specified torque.

Selection of screws & sealing rings
Different oil drain screws and sealing rings from the kit for adapting to the respective vehicle.
Technical & practical benefits
A focused kit for workshops, service teams and experienced users who want to repair – not replace.
Time-saving solution
Helps to avoid lengthy oil pan replacement and reduces downtime for the vehicle.
Reliable sealing
New screw and matching sealing ring support a tight and clean connection when correctly installed.
Clear procedure
Video, written steps and images make it easier to follow the repair at the vehicle.
Versatile use
Suitable for many passenger cars and light commercial vehicles with typical metric oil drain threads.
Cost-efficient
Repairing damaged threads instead of replacing complete components is often more economical.
Part of the V-COIL system
Complements other V-COIL solutions for automotive thread repair, such as spark plug and sensor threads.
Frequently asked questions
Short answers to common questions directly at the vehicle.
In many cases no. After draining the oil and cleaning the area, the new receiving thread can be cut directly on the installed oil pan. Always check accessibility and the general condition of the component before you start.
Yes. Aluminium oil pans are particularly prone to thread damage at the drain screw. The kit is well suited for these cases. Proceed carefully and always tighten with a torque wrench to the specified torque.
A torque wrench is strongly recommended. It helps to achieve the correct clamping force, ensures a tight seal and reduces the risk of damaging the newly cut thread or the sealing ring.
After refilling the engine oil, let the engine run briefly and check the area around the drain screw for leaks. Also check again after the first drive and at the next service or oil change.
Always follow the safety instructions, use suitable tools and observe the vehicle manufacturer’s information. When in doubt, carry out the repair in a professional workshop or consult our technical support.